Implementing Reports-To data-level security in Oracle BI (OBIEE)

In a previous post, Implementing data-level security in Oracle BI (OBIEE), I described data-level security and how to implement it in Oracle Business Intelligence (OBIEE).  In this post I will describe a special type of data-level security, called Reports-To security, and how to implement it in OBI.

For Reports-To data-level security, we want to secure data in such a way that we allow a user access only to data for his/her direct and indirect reports. In other words, each user will be able to see data only for people that are below him/her in the organization hierarchical chain.

Take a look at this example diagram:

ReportsTo_Security_Org_Position_Hier

If Reports-To security is applied to this example, Position# 303 would only be able to see information for Position# 409; and Position# 305 would only be able to see information for Position#’s 410, 411, 412; and a final example, Position# 201 would be able to see the information for Position#’s 303, 304, 305, 306, and 409, 410, 411, 412.

I use “Position” as the driving entity in the hierarchy instead of “Employee” because there are times when a position is vacant (no employee) and so it’s better to use the position which will always have a value.  However, you can use Employee if that works better in your scenario or if that’s what your data supports.

Let’s move on to how to implement this type of security.  The steps are similar to the steps in a previous post, Implementing data-level security in Oracle BI (OBIEE), but with some key differences. (Refer to that post for some of the more detailed steps not reiterated in this post.)

First, build a Reports-To data table and create the necessary ETL to ensure that it remains correct and up-to-date.  This table will contain each position (employee/user) and what position (employee) they report to. The data for this table will likely come from your HR system (such as PeopleSoft, Oracle EBS, SAP, Workday, home-grown system, etc.) that contains all the position and employee data.  Using the Organization Position Hierarchy diagram example, the table (REPORTS_TO_DATA) may look something like this:

REPORTS_TO_DATA

Next, create a Session Initialization Block (Init Block) with row-wise Initialization that will be used to get the list of all positions that report to the position of the current user and store them in a defined Target Variable.  If you log in, the Init Block will generate the list with all the positions (or employees) that report to you; and when Jane logs in, the Init Block will generate the list of all the positions (or employees) that report to her.

An important component of the SQL in the Init Block is that it needs to be recursive, because for each person, it needs to retrieve their direct reports, and then retrieve the people reporting to their direct reports, and so on down the line.  Using the above Organization Position Hierarchy diagram example, when the user in Position 202 logs in, the SQL needs to retrieve the positions reporting to 202 (which are 307 & 308), and then recursively retrieve the positions reporting to 307 and 308, and so on. The Target Variable used for storing the values in this example is: REPORTS_TO_POSITIONS

The Init Block, its SQL, and variable definition may look something like this:

Reports_To_Position_InitBlock2


Then finally, we need to create the data filters on the appropriate data sets (that need to be secured) using the variable containing the “list of positions” reporting to the current user (REPORT_TO_POSITIONS variable).  The needs to be done for each role that will access the reports that need to be secured by Reports-To security.

REPORTS_TO_Data_Filter

After this is all set, then Reports-To Security will be in effect for the filtered data sets and the reports that use them.

If you need to make it such that each user can only see data for his or her direct reports, the SQL can be modified to remove the recursion, and just return the direct report positions.

One final point … as you would with all changes, but particularly with solutions involving sensitive data, test your solution thoroughly – including making sure to perform both positive and negative testing.

Thanks for reading!


Implementing data-level security in Oracle BI (OBIEE)

Data Level Security involves securing the data available in an application in such a way that each user will see only the data that he/she is authorized to see, resulting in each user possibly seeing different results on the same report.   In this post I will describe how to implement data-level security in Oracle Business Intelligence (OBIEE).

Let’s use an example to describe data-level security.  Each user of the BI system works in or is assigned to a particular Business Unit.  Each user is allowed to see only the data for his or her assigned Business Unit.

In our example, the below table lists the 4 users and the Business Unit that each of them works in or is assigned to, and therefore, should have access to.  We will call this the USER_TO_BUSINESSUNIT table.
DataLevelSecurity_UsersBUs

Jane and Xing should only be able to see data for Business Unit BU2000, Bill should be able to access data for both BU3000 and BU4000, and Venkat should be able to access data for BU4000.

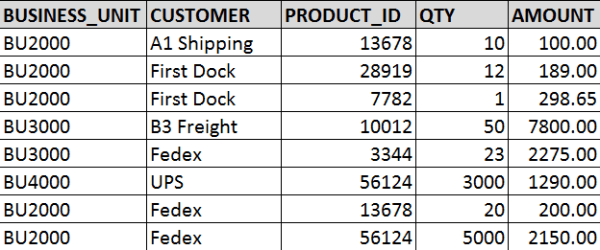
Now, we will use the below table as the example data set that we need to secure with the Business Unit data-level security.  We will call this table TRANSACTION_DATA.
DataLevelSecurity_AllData

When data-level security is applied …

Jane and Xing will be able to access/see the following data:
DataLevelSecurity_BU2000

Bill will able to access/see the following data:
DataLevelSecurity_BU3000_and_BU4000

And Venkat will be able to access/see the following data:
DataLevelSecurity_BU4000

So, now let’s move on to how to implement data-level security in OBI to achieve what was described above.

First, ensure that the USER_TO_BUSINESSUNIT table data is correct and up-to-date, and that there is an ETL in place or some other method of keeping that data updated. You want to ensure that if and when a user’s Business Unit changes, it is reflected in this table so that the user will have access to the appropriate data.

Next, create a Session Initialization Block with row-wise Initialization that will be used to get the list of Business Units that a user has access to.

Open the RPD -> Manage -> Variables
ManageVariables

In the Variable Manager -> Action -> New -> Session -> Initialization Block

This needs to be a “Session” Init block so that it will run each time a user logs in, and gets that user’s list of Business Units; and it needs to be row-wise because some users will have more than 1 value returned.

New_Session_InitBlock

In the Session Variable Initialization Block Dialog, enter a Name for the Init Block.

Then click Edit Data Source
InitBlockDialog

In the Data Source dialog, enter the SQL to get the Business Units for the current logged in user.  Click OK when done which closes this window and brings you back to the Session Variable Initialization Block Dialog.

InitBlockSQL

Click Edit Data Target in the Session Variable Initialization Block Dialog.

Enter your Variable name and check “Row-wise initialization”. As mentioned above, we need to select row-wise because our Init Block SQL may return more than 1 value for some users.   For example, when Bill in our example above data logs in, the Initialization Block will return values BU3000 and BU4000, and store them in the Target Variable, “BUSINESS_UNIT”.

You may also check “Use caching” to store the values in cache. Click OK when done.

SessionInitBlock_RowWiseTargetVariable
Then click OK to save the Init Block.

InitBlock_SetupComplete

Next, apply data filter(s) to the appropriate data set(s) for the appropriate role(s) using the Target Variable above.  You may have role(s) specifically used for data-level security and will need to apply it there, but if not, you will need to apply the filters in each role that has access to the datasets/dashboards/reports that you want to apply data-level security to.

Manage -> Identity
ManageIdentity

Go to the Application Roles tab, and select the Application Role to which you would like to apply the data-level security.  In the APplication Role dialog, click Permissions.
IdentityManager_ApplicationRole

In the Permissions dialog, select the layer and data table that you want to apply the data security to, and then enter the appropriate filter.  In this example, you are filtering by BUSINESS_UNIT.  This will cause the data to be filtered to only include each users’ Business Units.
DataFilter

Save your changes.  You have now applied data-level security.  This is what will happen now:

User logs in -> Init Block runs and selects the Business Units associated with the user’s User ID -> Init Block assigns value(s) to the variable BUSINESS_UNIT -> if the user is a member of a role that has data security applied to -and- the user visits the report -> the data filter will be triggered/run -> User only sees data for the Business Units the user is allowed to see.

Look out for my upcoming post on implementing a special type of data-level security: Reports-To Data Level Security.

Thanks for reading!

Change an Oracle database user password

This is a simple post for how to change the password for an Oracle database user.  Every now and again we need to do this, but may forget how to or forget the exact syntax needed.

When you need to change the password for an Oracle database user, you can use the following command after logging into the database using SQL Developer, Toad, or SQL*Plus for example.

alter user [user_name] identified by "[new password]" replace "[old password]";

Put the double quotes around the password values, particularly if your password includes special characters.

You may also use a GUI option in SQL Developer. In SQL Developer, right-click the appropriate database and select “Reset Password” from the menu.
SQL_Developer_Reset_Password

And then enter the user, old and new passwords in the “Enter New Password” dialog.
SQL_Developer_ChangePassword_Dialog

I am updating this post to add another method for changing a user’s Oracle password.

In SQL Developer, when connect to the database, enter and run the command “password”.  This will then pop-up a “New password” dialog in which you can enter the new password.
OracleDatabase_ChangePassword_passwordcommand

Thanks for reading!

Upgrading OBIEE 11g to OBIEE 12c – First thing to ensure

Our team is currently in the process of upgrading our OBIEE 11g environments to OBIEE 12c. I have been gathering information about the process and will be sharing information on our experience as we progress.

I wanted to point of the first thing you want to ensure before planning/starting the upgrade from 11g to 12c – this may save you a little time. Or if you have already started, and encountered an error relating to … catalog version is not supported … then this post might be helpful.

You can upgrade the OBIEE catalog from OBIEE 11.1.1.7.x or OBIEE 11.1.1.9.x to OBIEE 12c. This should upgrade without any major issues.
But you may unexpectedly run into the above problem if you had upgraded the OBIEE 11g catalog using patch sets and had not run the full catalog upgrade. This results in the catalog being used as an 11.1.1.7 or 11.1.1.9 environment, but the version stored in the catalog is still older (such as 11.1.1.3 or 11.1.1.5).
Then when you try to upgrade from OBIEE 11g to OBIEE 12c, you get the error because the catalog is still technically not yet on an approved version for upgrade.

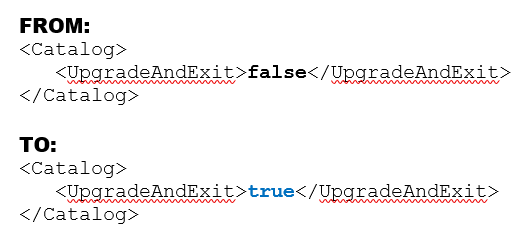
To resolve this, you need to run a full catalog upgrade on the OBIEE 11g catalog. This involves modifying the instanceconfig.xml file as follows:

Change the value of the UpgradeAndExit parameter from “false” to “true” as shown in the example below.

upgradecatalog

Restart the presentation services.
After this is complete, edit the files again and change “true” back to “false“, and restart the presentation services again.

You should now be able to upgrade your catalog to an OBIEE 12c version.

I hope this helps. Thanks for reading.

Terminology Primer – Goals, Objectives, Measures, Metrics, Key Performance Indicators (KPIs), Meters

The essential purpose of business intelligence is to provide information that will allow people throughout an organization to make informed decisions relevant to their business processes and responsibilities.  This post is a simple terminology primer that describes the meaning of a few terms commonly used in business intelligence, and explain how they relate to each other, and their relevance to supporting the overall goals of an organization.

Goals are a business’ desired outcomes. They are typically around growth, cost savings, innovation, improvement in efficiency, the company’s workforce, and the competition, but may include a lot of other things.
Goals help a company to stay focused by providing team members within a company with an aim to work towards.

Objectives are specific strategies and steps that a business needs to take to achieve the goals that have set. These objectives are usually specific and measurable.  Success toward achieving objectives usually indicates progress toward achieving goals.
Objectives are sometimes referred to as Critical Success Factors because they are critical to the success of achieving the goals.

Measures are numeric representations of various transactions that occur through various business processes. For example, when the company makes a sale (during the sales process), some measures that are generated in that transaction are:  sales amount, discount amount, number of items sold, and number of items discounted.  Then from this, other measures can be determined, such as total sales for all customers, total number of items sold, total number of sales for each customer, and so on.  Measures are numeric and therefore can have mathematical calculations performed on them – such as sum, avg., min, max, etc. – to generate metrics.

Metrics are calculations derived from one or more measures. For example, as mentioned in an example above, you may have the measures “Discount Amount” and “Number of Items Discounted”, and you may use these measures to calculate a metric of “Average Discount Amount per Discounted Item” or “Average Discount Amount per Sale”.  As another example, you may simply add up all the Discount Amounts over a specific time period, such as month, to get a “Total Discount Amount by Month” metric.

Key Performance Indicators (KPIs) are metrics that measure how well a company is doing toward their objectives. Companies will have hundreds or thousands of metrics, but there will be a few key ones that the executive team wants to keep a close eye on for the overall company or divisions, and other managers will want to keep an eye on KPIs relevant to their respective departments.  Those key metrics are the KPIs. All KPIs are metrics, but not all metrics are KPIs.

Meters are a group of metrics that collectively provide a broader, overall view of a subject area.
For example, you may have individual metrics for Sales to Date, Sales in Pipeline, Number/Value of Expiring Contracts, Avg. Time to Close Sales, etc. Putting these all together in a Meter presents the user with a lot of related information that provides a broad, overall picture of sales (and loss of sales) which would allow for analysis such as determining the chances of meeting sales targets. The Meter in this example could be called “Sales Forecast” for example.

Thanks for reading!

How to embed a QlikView dashboard into an OBIEE dashboard page

In this post, I will explain how to embed a QlikView dashboard into an OBIEE dashboard page.

This can be useful if you have a scenario where OBI is your primary platform, but there are also dashboards built in QlikView or some other BI Platform, and you want to direct the users to one place for all dashboards instead of having to explain to them to “go here for this, and there for that”.

So, I am assuming you already have a QlikView dashboard built that you would like to embed into OBIEE.

Create or edit your OBIEE dashboard page. While on the page in edit mode, drop in/drag in an “Embedded Content” object.
DashboardObjectsMenu_EmbeddedContent

With the Embedded Content Object on the dashboard page in Edit mode, edit the “Embedded Content” Object.
Edit_EmbeddedContent_Object

In the Embedded Content Properties dialog …
– Enter the URL to your QlikView dashboard
– Check the box for “This URL Embeds an Application”
– and enter the Width and Height you desire for the embedded area.
– Optionally, check the box for “Hide Scroll Bars”. Make sure not to check this box if your dashboard is vertically longer than a typical monitor.
EmbeddedContent_properties

Click OK, and then Save your dashboard page.

When you now open your dashboard in OBIEE, you will see your QlikView dashboard embedded within the page.

QlikView_Embedded_in_OBIEE

Thanks for reading!  I hope you found this article useful.

Unable to see the SQL Override SQL in Informatica SQL Qualifier Transformation

I had an issue in Informatica where I was not able to see the SQL Override SQL code in the SQL Qualifier.

It turns out this was caused by switching the application interface between double monitors or disconnecting from double monitors while one of the Informatica application windows was on the secondary monitor screen, which led to changed settings in the registry.

I found a resolution on the Oracle site and this post explains how to resolve in detail.

To correct this, you need to update the appropriate registry settings. As a precautionary measure, you should backup your registry before making changes to it.

Follow these steps to resolve.
1. Close out all Informatica applications.
2. Click your Windows start icon, and type in regedit.   Then double-click “regedit.exe” to run it.

regedit

3. From the Registry Editor window, navigate as follows …

HKEY_CURRENT_USER -> Software -> Informatica -> PowerMart Client Tools -> 9.5.1 -> Designer -> Options -> Global -> Editor -> SQL
Note: The path will vary based on your installed version. So, instead of “9.5.1”, you may have another version number.

regedit_before

4. Locate these 4 values, which you will update, on the right-hand side of the Registry Editor window (highlighted in the image above):

  • Expression Editor Position
  • Expression Editor Splitter Position
  • SQL Editor Position
  • SQL Editor Splitter Position

5. Edit each of the 4 values one at a time, by double-clicking on them.

regedit_update_valuesAnd you will be changing the 16 values highlighted in the image above.

This is an example of what the values will look like before you make any changes.
regedit_values_before

In the Edit Binary Value window, update the 16 double character values to all be ‘00’

For each key value, the Edit Binary Value window should look like this after the update.
regedit_values_after

6. Click ok. Then repeat for each of the other values.

When you have updated all 4 keys, your Registry Editor window should look like this. Note that the values are now all ’00’.

regedit_after

7. Close the Registry Editor and open your Informatica application and check if it is resolved.  Hopefully, it will be.

I haven’t done any exhaustive testing on this to determine all scenarios under which this happens, but I think the way to prevent this is, if you are using multiple monitors, use only your primary monitor for Informatica applications, or bring your Informatica application windows back to your primary monitor before closing them and before disconnecting your computer from the secondary monitor.

The CONCATENATE statement, concat() function, and string concatenation operator (&) in QlikView

In QlikView, there is the CONCATENATE statement, the CONCAT() function, and the string concatenation operator (the ampersand – &).  These are all very different and in this post I will explain each of them.

CONCATENATE statement

The CONCATENATE statement is used in conjunction with the LOAD statement.  It appends the rows of one table to another.  It is similar to a UNION ALL statement in SQL.

Let’s take a look at a couple examples using the following tables:

Employee_Location

Employee_ID Employee_Name Employee_Location
1 John NY
2 Mary NJ

Employee_Office

Employee_ID Employee_Name Employee_State
3 Jane FL
4 Evan NY

Employee_Position

Employee_ID Employee_Name Employee_Position
5 Paul Cashier
6 Sonia Salesperson

If we concatenated the Employee_Location and Employee_Office tables using the following load script …

[Employee_Location]:
 LOAD
 [Employee_ID]       as [%Employee ID],
 [Employee_Name]     as [Employee Name],
 [Employee_Location] as [Employee Location]
 FROM [… data source details for Employee_Location …]

CONCATENATE (Employee_Location)
 LOAD
 [Employee_ID]        as [%Employee ID],
 [Employee_Name]      as [Employee Name],
 [Employee_State]     as [Employee Location]  --aliased column
 FROM [… data source details for Employee_Office …]

We would get this result …

Employee_Location

Employee ID Employee Name Employee Location
1 John NY
2 Mary NJ
3 Jane FL
4 Evan NY

Now, if we concatenated the Employee_Location and Employee_Position tables using the following script…

[Employee_Information]:
 LOAD
 [Employee_ID]       as [%Employee ID],
 [Employee_Name]     as [Employee Name],
 [Employee_Location] as [Employee Location]
 FROM [… data source details for Employee_Location …]

CONCATENATE (Employee_Information)
 LOAD
 [Employee_ID]        as [%Employee ID],
 [Employee_Name]      as [Employee Name],
 [Employee_Position]  as [Employee Position]
 FROM [… data source details for Employee_Position …]

We would get this result …

Employee_Information

Employee ID Employee Name Employee Location Employee Position
1 John NY  
2 Mary NJ  
5 Paul   Cashier
6 Sonia   Salesperson

Notice that the concatenation works even if the tables do not have the same number of columns.  This provide more flexibility than the UNION or UNION ALL statements in SQL where you need to add a dummy column to the select list of your first table before performing the union.

Concat() function

The concat() function concatenates all the values of a column into a single delimited string.  The column and the delimiter are specified as parameters in the function.  You also have the option of producing the result string with only distinct values.

For example, if you have the following table …

Product_ID Product_Description Product_Category
1212 Pen Office Supplies
3214 Paper Paper
1345 Sharpener Office Supplies
1177 Eraser Office Supplies
2780 Calculator Electronics
2901 Computer Electronics
This statement: CONCAT(Product_Category, ‘,’)

Produces: Electronics, Electronics, Office Supplies, Office Supplies, Office Supplies, Paper
Notice there is a space after the comma in the delimiter, and therefore, there is a space after the comma in the output

This statement:   CONCAT(Product_Category, ‘|’)

Produces: Electronics|Electronics|Office Supplies|Office Supplies|Office Supplies|Paper
Notice there is no space in the delimiter, and therefore, no space between the values in the output

This statement:  CONCAT(DISTINCT Product_Category, ‘ | ’)

Produces:             Electronics | Office Supplies | Paper
Notice spaces in the delimiter, and distinct output.

Concatenation operator ( & )

When you need to concatenate 2 strings together, you use the concatenation operator – the ampersand (&).  For example, if you have address values in separate columns as in the table below …

Street City State Zip
123 Main St Orlando FL 32801

… you can output the address as one concatenated string by using the concatenation operator as shown in the script below …

[Street] & ‘, ‘ & [City] & ‘, ‘ & [State] & ‘ ‘ & [Zip]

[Notice a comma and a space is concatenated between Street, City and State; 
and only a space is concatenate between State and Zip]

… and that would produce the following result …
123 Main St, Orlando, FL 32801

Oracle Advanced Security Summary

With the expansion of Self-Service BI, BI Teams need to be more vigilant about protecting sensitive data.
This is a summary of options available for protecting data in Oracle databases.
The information in this post was found here and summarized for a quick read: https://docs.oracle.com/database/121/ASOAG/toc.htm

The 3 features available are (1) Transparent Data Encryption, (2) Data Redaction, and (3) Data Masking and Subsetting Pack.
Here is a quick summary.

(1) Transparent Data Encryption (TDE)

  • Encrypt data so only authorized people can see it
  • Use it to protect sensitive data that maybe in an unprotected environment, such backup data sent to a storage facility
  • You can encrypt an individual column or an entire tablespace
  • Applications using encrypted data can function just the same

(2) Data Redaction

  • Enable the redaction (masking) of column data in tables
  • Redaction can be full, partial, based on regular expressions, or random
    • Full redaction: replaces strings with a single blank space ‘ ‘; numbers with zero (0); dates with 01-JAN-01
    • Partial redaction: replaces a portion of the column data; for example SSN: ***-**-1234
    • Regular expressions: can be used to perform partial or full redactions
    • Random: generates random values for display when accessed
  • The redaction takes place at runtime; not in the permanent data stored

(3) Oracle Enterprise Manager Data Masking and Subsetting Pack

  • enables you to create a “safe” development or test copy of the production database


Let’s look into some more details …

(1) Transparent Data Encryption (TDE)

  • TDE uses a two-tiered key-based architecture
  • TDE column encryption uses the two-tiered key-based architecture to transparently encrypt and decrypt sensitive table columns. The TDE master encryption key is stored in an external security module, which can be an Oracle software keystore or hardware keystore. This TDE master encryption key encrypts and decrypts the TDE table key, which in turn encrypts and decrypts data in the table column.
  • A Key Management Framework is used for TDE to store and manage keys and credentials.
    • Includes the keystore to store the TDE master encryption keys and the management framework to manage keystore and key operations
    • The Oracle keystore stores a history of retired TDE master encryption keys, which enables you to change them and still be able to decrypt data that was encrypted under an earlier TDE master encryption key.
  • Types of Keystores
    • Software keystores
    • Hardware, or HSM-based, keystores
  • Types of Software Keystores:
    • auto-login software keystores that are local to the computer on which they are created.
    • cannot be opened on any computer other than the one on which they are created.
    • typically used for scenarios where additional security is required while supporting an unattended operation
    • Password-based software keystores
      • protected by using a password that you create. You must open this type of keystore before the keys can be retrieved or used.
    • Auto-login software keystores
      • protected by a system-generated password, and do not need to be explicitly opened; automatically opened when accessed.
      • can be used across different systems; ideal for unattended scenarios.
    • Local auto-login software keystores
  • Steps for configuring a Software Keystore
    • Step 1: Set the Software Keystore Location in the sqlnet.ora File
    • Step 2: Create the Software Keystore
    • Step 3: Open the Software Keystore
    • Step 4: Set the Software TDE Master Encryption Key
    • Step 5: Encrypt Your Data
  • Oracle Database checks the sqlnet.ora file for the directory location of the keystore, whether it is a software keystore or a hardware module security (HSM) keystore.
  • You cannot change an existing tablespace to make it encrypted
  • You can create or modify columns to be encrypted


(2) Data Redaction

  • Define data redaction policies to specify what data needs to be redacted
  • Use policy expressions to set whether a user sees the redacted data or the full data
  • Policy Procedures
    • DBMS_REDACT.ADD_POLICY
    • DBMS_REDACT.ALTER_POLICY
    • DBMS_REDACT.ENABLE_POLICY
    • DBMS_REDACT.DISABLE_POLICY
    • DBMS_REDACT.DROP_POLICY
  • Sample scrip
    • BEGIN
      DBMS_REDACT.ADD_POLICY(
      object_schema => ‘hr’,
      object_name => ’employees’,
      column_name => ‘commission_pct’,
      policy_name => ‘redact_com_pct’,
      function_type => DBMS_REDACT.PARTIAL, –partial;  use DBMS_REDACT.FULL for full
      function_parameters => DBMS_REDACT.REDACT_US_SSN_F5,  — many standard params, but it can also be custom
      expression =>  ‘SYS_CONTEXT(”SYS_SESSION_ROLES”,”MGR”) = ”FALSE”’); –allows MGR role to see data
      policy_description => ‘Partially redacts 1st 5 digits in SS numbers’,
      column_description => ‘ssn contains Social Security numbers’);
      END;
      /
  • Use DBMS_REDACT.ALTER_POLICY and action => DBMS_REDACT.ADD_COLUMN to redact multiple columns
  • Redaction takes place on select lists and not on where clauses
  • Be aware of the scenarios when using redacted tables to build other tables or views


(3) Oracle Enterprise Manager Data Masking and Subsetting Pack (DMSP)

  • DMSP enables you to create a development or test copy of the production database, by taking the data in the production database, masking this data in bulk, and/or creating a subset of the data, and then putting the resulting masked data and/or subset of data in the development or test copy.
  • You can still apply Data Redaction policies to the non-production database, in order to redact columns
  • Used to mask data sets when you want to move the data to development and test environments.
  • Data Redaction is mainly designed for redacting at runtime for production applications

——–

I hope you found this helpful to get you started on taking the steps to protect your data internally and externally.
You can visit the link I provided above to find more details.

DAC Execution Plan Failure – “No active subject areas for execution plan”

When your Oracle Business Intelligence Applications (OBIA) DAC Execution Plan fails with a message that looks like this …

“Retrieving execution plan informationMESSAGE:::com.siebel.analytics.etl.execution.exceptions.EmptyExecutionPlanException: No active subject areas for execution plan were found
EXCEPTION CLASS::: com.siebel.analytics.etl.execution.ExecutionPlanInitializationException

com.siebel.analytics.etl.execution.ExecutionParameters.(ExecutionParameters.java:111)
com.siebel.analytics.etl.execution.ExecutionParameterHelper.(ExecutionParameterHelpe”

It is likely that you have a missing Subject Area in your Execution Plan in DAC.  You need to attach the Subject Area to the Execution Plan and rebuild the Plan.

After doing this your job should run successfully.